
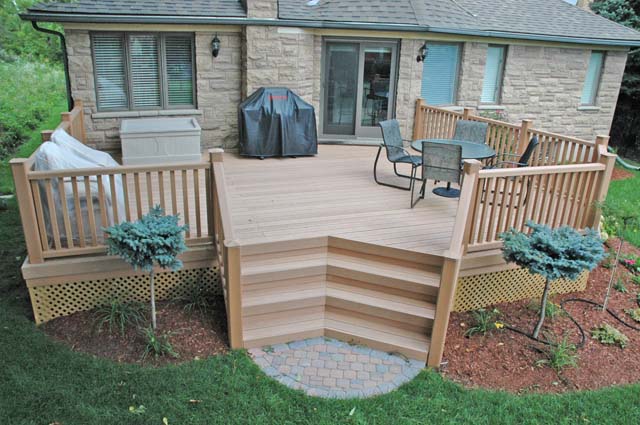
You sank the posts, built the frame and installed the deck board. Bravo. Now comes all of those little jobs that we affectionately label “finishing touches.” Basically that is everything that doesn’t fit neatly into its own category.
Maybe you don’t need a railing or stairs on your ground level deck. Or it could be that flower boxes are just not your thing. Maybe skirting is irrelevant (on walkout decks you aren’t going to bother) or fascia board is something you trimmed off the budget.
Or maybe you’re going to tackle all of these things. Good for you. Now get moving.
Railing
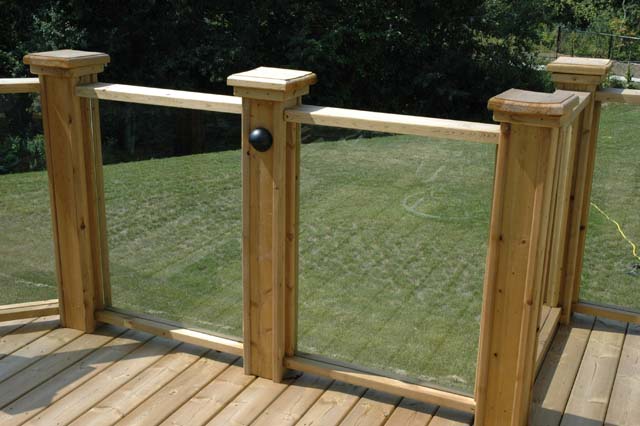
Tempered glass railing in a wood frame.
If your deck is more than 24 inches off the ground then you’re going to need a railing. There are plenty of options for the DIY deck crew, from the perennial favorite 2×2 pickets to a component aluminum system and even tempered glass railing. Pick whichever suits your style, house and budget.
Post spacing should be somewhere around 4ft on-center. Check with your local building code in case they give you more leeway. For convenience and comfort, you should look for a railing style with a top rail wide enough to set your drink on.
Pre-made steel, aluminum and glass sections will come with instructions. Follow them. And be sure to double check all of your post spacing before you start installing the sections. This is especially true if the sections were special ordered.
Remember that the railing on your stairway has an angle. Build the stairs first and again, double check your measurements.
Privacy Screens

Herringbone privacy screen with a decorative beam.
Essential for most yards in suburbia, a privacy screen is basically a fence installed on your deck instead of a railing. You can use 4×4 or 5×5 posts, 2×4 stringers/crossbeams and then either deck boards (5/4×6) or fence boards (1×6) for the privacy part. Create an interesting design with lattice or top the screen with a decorative beam.
Use your imagination and introduce some creativity here. It’ll give your neighbors something nice to look at instead of spying on you.
Stairs
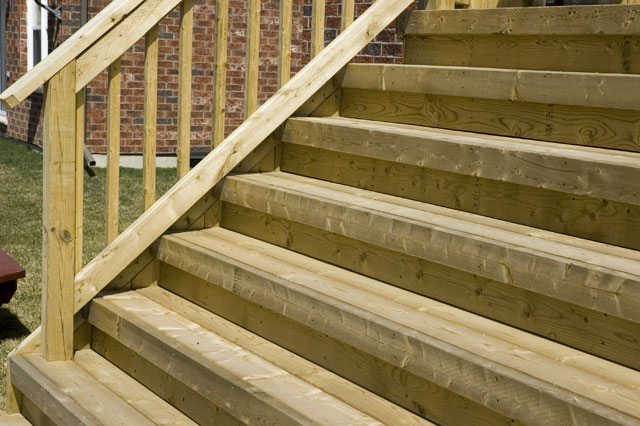
Deck stairs, up close and personal.
You can pick up stair stringers from the lumber stores (they come in wood or steel versions) or you can cut them yourself. Contractors often use 2×12 lumber and notch out a 9 inch wide run (the part that you step on).
Building stairs can get complicated, so pay attention. There are a lot of measurements and calculations you’ll need to do, but once it all comes together, it’s a beautiful thing.
A few important numbers to remember:
- Maximum rise (height of the stair) is 7 3/4″. Minimum Rise is 4″.
- You’re allowed no more than 3/8″ difference between rises on the stairway (that means you can’t get to the bottom or top step and just fudge it – all of the stairs must be equal height or within 3/8″ of each other)
- Minimum stair tread run (or depth) is 10″ – no maximum
- Minimum width of stairs is 36″ although recommended minimum width is 48″
- Stair Stringers must have a minimum depth of 5″ from the inside corner of the stair to the back edge of the stringer (use a 2×12 and this won’t be a problem)
- Maximum spacing in any one place between the stairs and the bottom of the railing is 6″
- Maximum spacing between stair stringers is 16″ on center – meaning on a 36″ wide stair, you’ll need four stringers
** Note ** These figures are pulled from the IRC (International Residential Code). Your best bet is to check with the local building codes to get the measurements relevant to your area. The golden rule is to always make the building inspectors happy.

Open faced stairs running down the front of the deck to save yard space.
You’ll need to measure how high off the ground your deck is. Divide that by 7 or 7 1/2″ – this will give you the number of rises. Don’t forget that the ground and the deck itself count as a rise.
Now take that number and multiply it by 10″ (or more if your treads will be deeper). That is how far out your stairs will go. If that distance infringes on your property line or anything else, you’ll need to install a landing in place of one rise and turn the stairs.
Don’t forget to include a flat space of at least 3 foot square at the bottom of your stairs. Patio slabs work just fine.
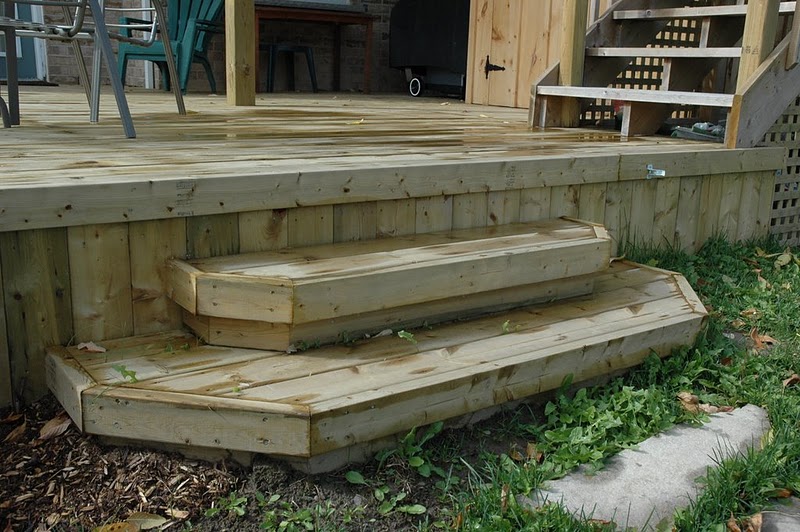
Angled box steps for easy stair construction.
For the treads you can use two deck boards butted together or one 2×10 cut to length.
If your deck is only a few feet off the ground you can save a lot of headaches by building box steps. These are literally small deck frames attached together and tied into the larger deck, creating steps to grade.
Flower Boxes
Build boxes from deck boards and install them permanently onto your deck as a patio garden. Or use tall flower boxes as railing and to flank the stairs. Don’t forget to install a liner designed to retain that valuable potting soil and water your flower boxes regularly.
Skirting
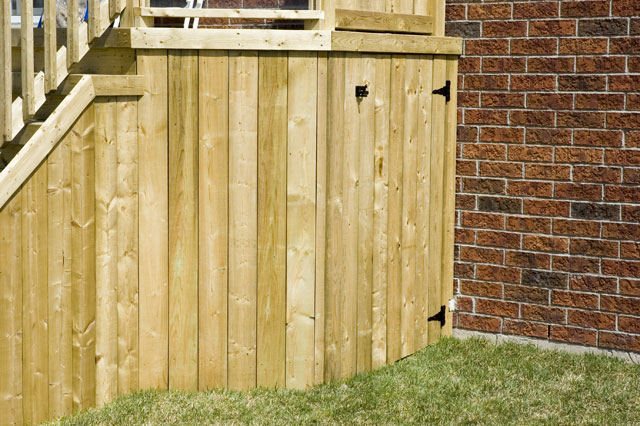
Vertical board deck skirting with gate.
Close off the space between your deck frame and ground with lattice or vertical board skirting. This will help keep the critters out of there and provide a neat and tidy appearance. If you drop something between the deck boards, skirting makes it a lot harder to retrieve, so hang onto your pocket change.
Skirting boards or lattice are attached to that ring joist you installed way back in step 2. They can be installed flush to the ground or you can excavate and bury the boards down a few inches. It’s up to you. Use the skirting as backing for a border garden and be sure to put a gate in somewhere. Use a gravity latch and simple hinges for the gate or just screw a removable section in.
Fascia Board

2x4 makes for a nice profile on your fascia board.
A 2×6 or 2×8 board nailed along the outside of the ring joists to cover up the ends of your deck board may seem unnecessary but it will give your deck a profile that looks professional and classy. Go ahead and skip it if you want, but this finishing touch is simple to do, carries a small price tag and delivers an impressive look.
Personalize your deck with any or all of these finishing touches. This is the stuff that will set yours apart from the other decks in the neighborhood and make the space feel like home. Take your time, check your measurements and have fun.
Then congratulate yourself. You just built a wood deck to be proud of!
Step 3 – Bring On the Deck Boards
You’ve done well. The posts are in and the framing for your deck is complete and solid. Now for the fun (and fast) part.
Installing deck boards is a fairly straightforward job involving a lot of repetitive work. First you measure, then you cut, then you fasten. Lather, rinse, repeat, you know the sort of thing.
Required Materials & Tools ~
2×6 or 5/4×6 deck board (5/4 has a rounded edge that makes a nice finish)
Nails or screws that are rated for use with ACQ lumber (if using pressure treated wood) – OR – Color matched screws for use with Composites
Circular Saw
Carpenter pencil
Saw horse and tarp
Screw gun / Air nailer / Some sort of fastening tool
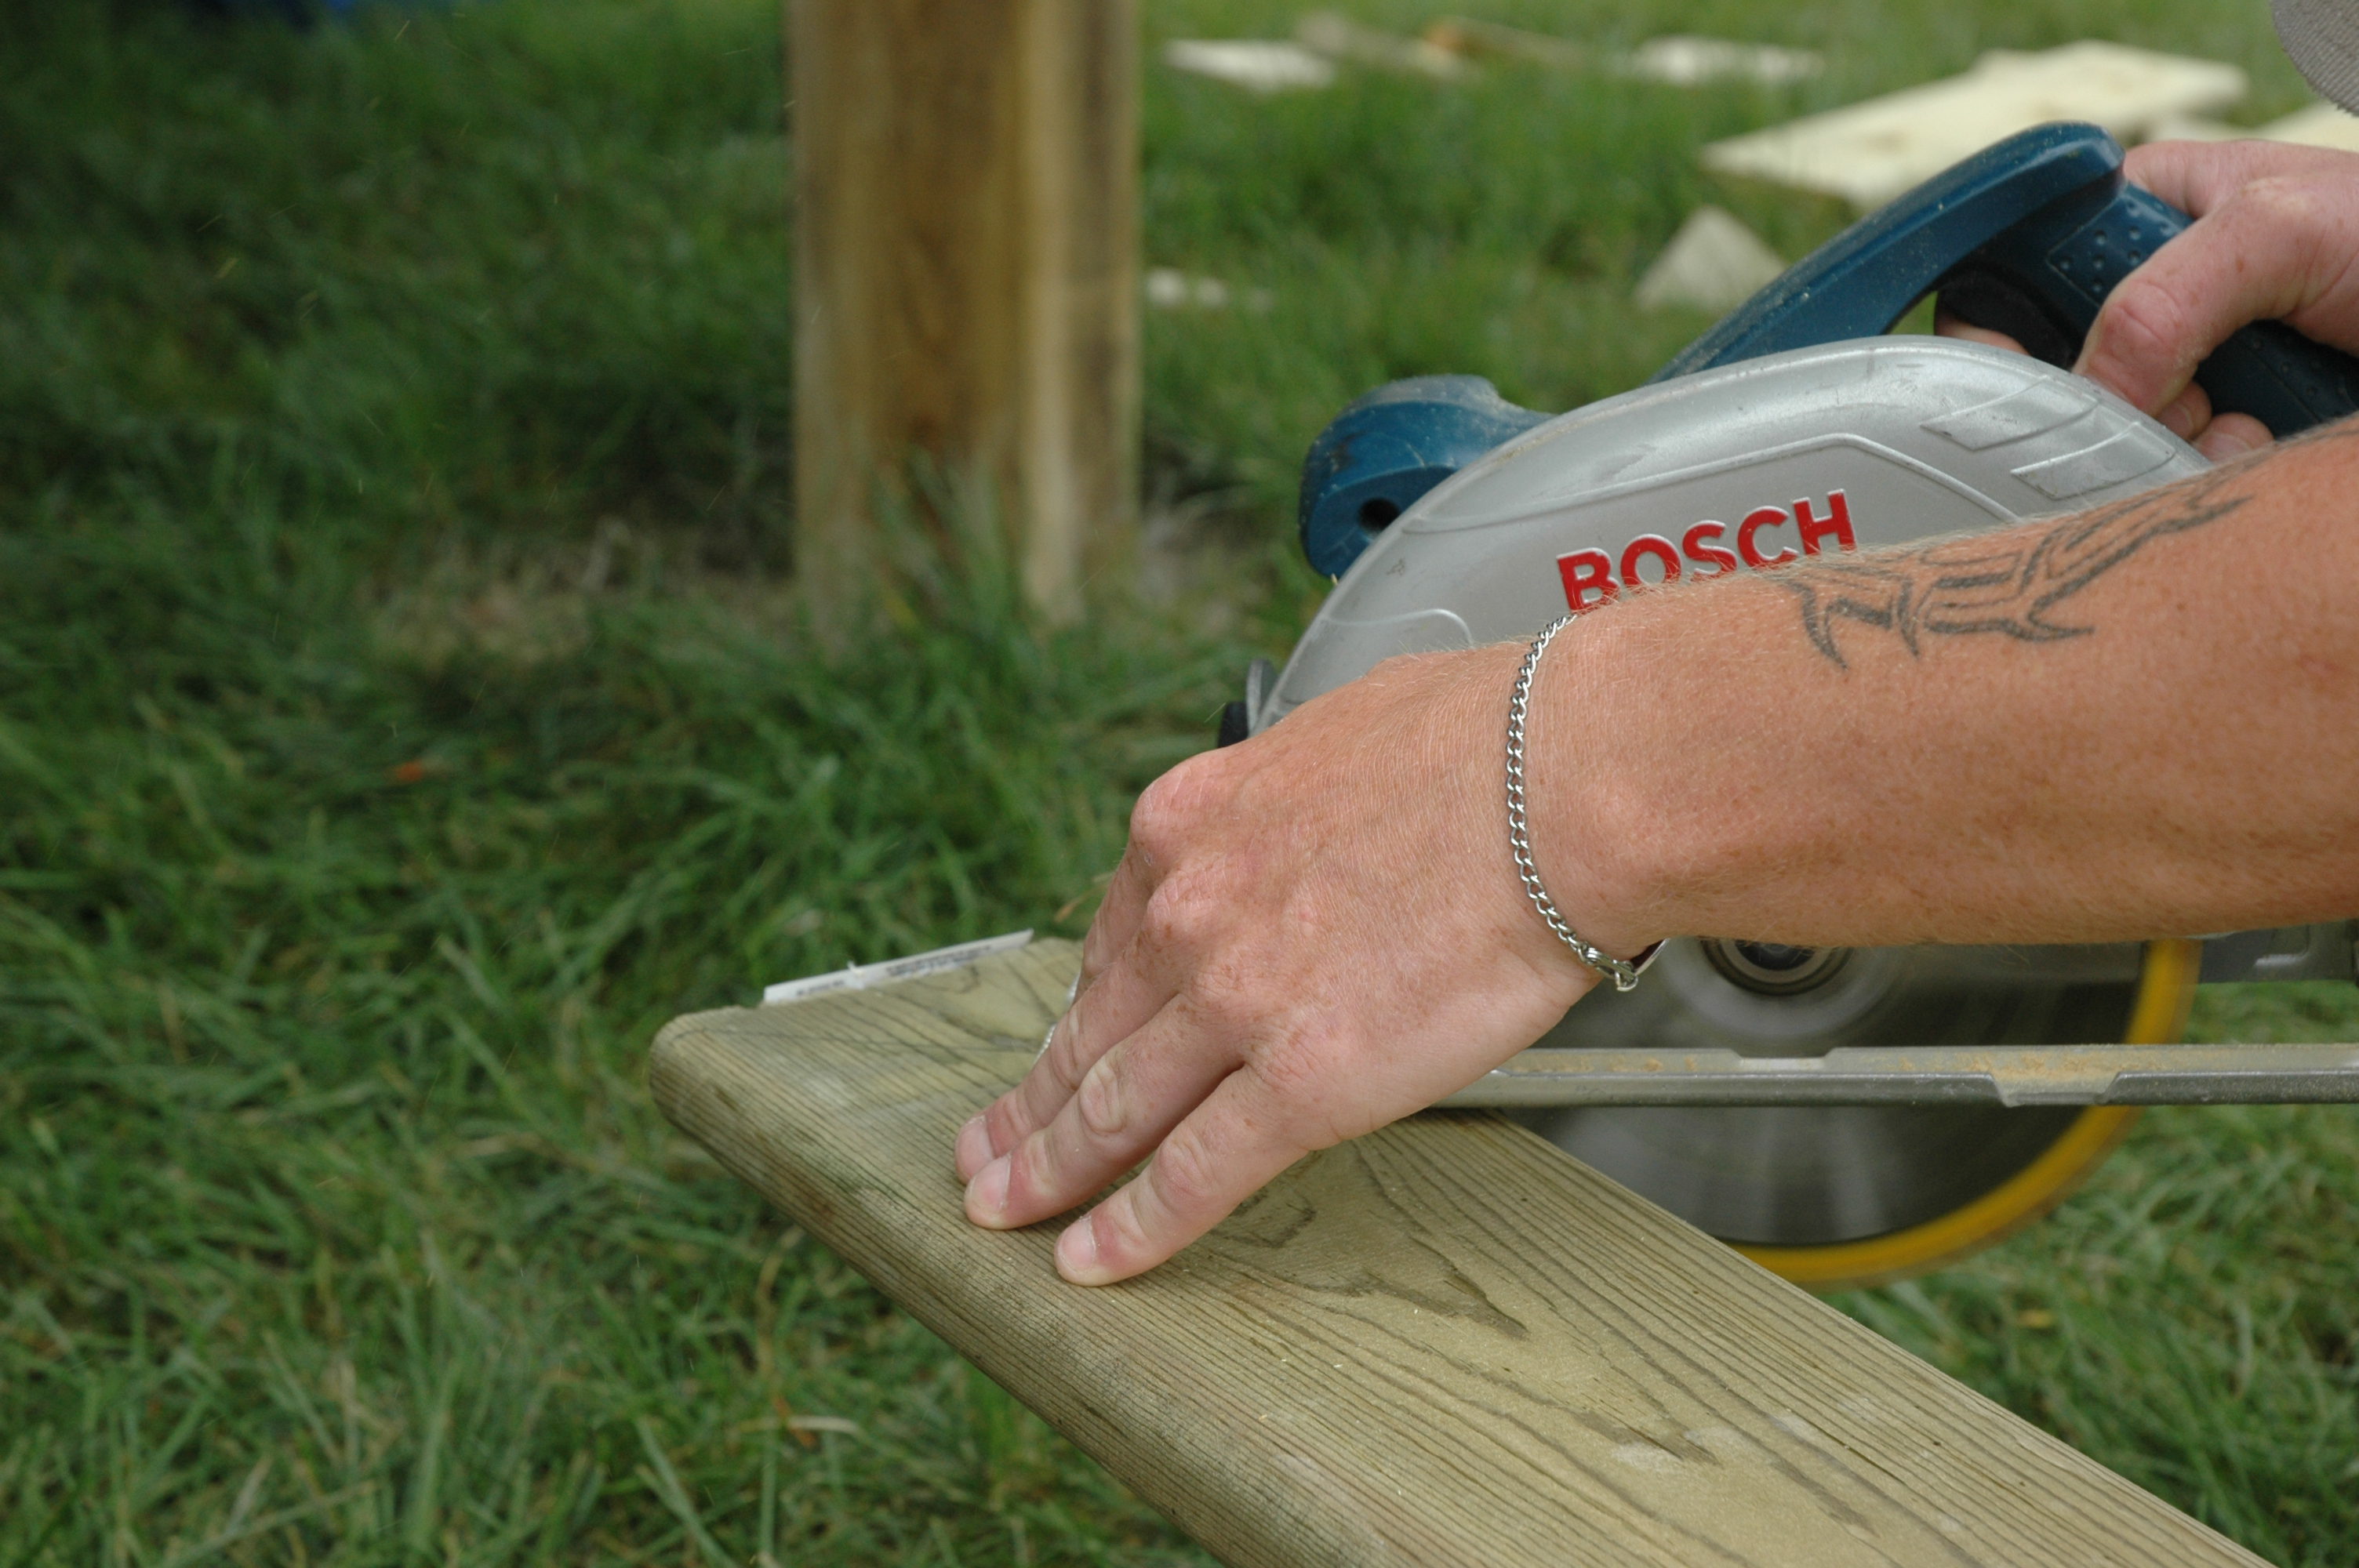
Your circular saw will trim the deck boards along a carpenter pencil line.
• Measure – This is real easy if you designed a 12, 14 or 16 foot wide deck, since deck boards generally come in those lengths. If that didn’t happen or if you’re installing the boards on a 45 degree angle, you’ll need to lay each board onto the frame and mark the cut line with your carpenter pencil. Take your time.
• Cut – Use a circular saw, a steady hand and a few saw horses for this job. You can use a table saw out in the lawn to rip down boards at either end of the deck. This cutting process gets messy, so you might want to set a tarp out to catch the sawdust and make clean-up a breeze.

Deck boards are fastened directly onto the joists, unless you're using a hidden fastener system.
• Fasten – Attach the deck boards at the joists with two 3” nails or screws (#8 x 2.5”) in each joist. Common nails are considered the best for decking and wood framing. Speaking of that, whether you use nails or screws on wood decking is entirely up to you. An air nailer is fast and makes a clean shot once you get the hang of it. Screw guns are another option for speed. Many professional deck contractors believe that structurally speaking, screws aren’t any better than nails and using them just drives the cost up. DIY enthusiasts are better to stick with nails for speed, price and efficiency.
For composite products you’ll need a specialty screw with a reverse thread on the top end. Don’t forget to get a color-matched type. The Deckfast composite line from Starborn Industries is an excellent choice, reasonably priced and available in 7 different colors. Torx drive steel, epoxy-coated and featuring an auger point, these screws deliver what you need for composite decking. Check out the online Deck Match tool for a fool proof way to find that perfect color match.

Senco Duraspin screw gun
Upgrade to the Headcote line, also from Starborn and specially made for use with Azek composite. Pick either the torx drive screw or the straight square drive stainless steel, both come with an auger point. Cut down on any mushrooming (that’s waste build up around the screw hole, not something to stir fry) and make pre-drilling a cinch with Starborn’s SmartBit. This handy extension works especially well for the Headcote line and is worth every penny.
Hidden fastener systems can be use with both wood and composite products. Using these is fairly time consuming (expect the deck board application to take about twice as long as normal), but delivers an incredibly smooth, clean finish.
Composite Vs. Treated Wood
You’ve heard a lot about composite decking products and may be wondering whether they are the product for you.
Composite decking makes a gorgeous finish, but costs a fair bit more.
The cost is exponentially higher than standard treated lumber, sometimes as much as three times the cost for the deck boards. That said, you will be buying a lifelong product though and can enjoy years of a splinter-free surface.
Quick comparison. Your average 300 square foot pressure treated ground level deck with railing would run around $3000 for materials. The same deck using Trex Contours or Accents deck board pushes you closer to $5000 and the Transcends line is even higher.
As for the maintenance factor, don’t be fooled. There isn’t a product out there that is truly maintenance free. Wood will need to be stained in order to keep its good looks, often times annually. Composite products don’t need to be stained, but they will grow mold, could discolor and will require annual cleaning to keep them up to snuff. That process won’t take as long as the average wood deck staining job (and definitely isn’t as messy), but don’t invest the money in composite thinking you can install it and forget it.
Everything requires maintenance.
Whatever option you choose, now that the deck boards are on, your project is nearly complete. Sit out on the fresh, new surface and have a gander at your handiwork. Step 4 is up next, where we tackle railings, fascia board and stairs. Kind of like putting the jacket and tie (or makeup and shoes) on our deck, those touches will really dress up the backyard.
Step 2 – Framing For Fun
So you have your posts in, rock solid 4×4s or 6×6s ready to hold up your deck framing. Now it’s time to put together a frame in the right shape and size for your dream backyard deck.
Maybe you’ve planned for a multi-level design or are getting ambitious with a rounded front or an octagon inset. Whatever your dream is now is when it starts to take shape.
Ideally you’ve either used quick-setting concrete for the posts or have let them set for three to four days. So get to it already. Framing for a medium to large sized deck should take anywhere from a half to a full day for completion.
Start Against the House

Joist hanger is attached to the ledger, which is tied into the wall with hardware.
Attaching or hanging the ledger board against your house is the important first step. Get out the level and 1/2” x 10” stainless steel carriage bolts. You’ll need to go through a 2×8 and into the foundation, securing your deck frame to the house. Use the appropriate washers and nuts to tie it all together.
On a walkout level deck this essential fastener will connect the 2×8 ledger to the inside framing of your house, traveling through the exterior finish whether brick, siding or stucco.
From the Ledger Out
Once it’s up and secure, nail joist hangers onto the ledger every 16”. Be sure to use 1 1/2” nails (sometimes called joist hanger nails) that are rated for use with today’s pressure treated wood. All framing hardware and fasteners need to be hot dipped galvanized (at the very least) in order for them to last when in contact with ACQ lumber treatments. Even if your decking is composite, cedar or another type of lumber, the framing is almost always built out of treated wood.
Galvanized is the basic stuff. If you want real dependability, opt for 18-8 or 316 stainless steel. You’ll get your money’s worth in longevity and strength.

Laminated 2x8 beam notched into the side of a 4x4 post.
Beam Me Back to the Posts
At a level just below the ledger board, attach the beams to your wood posts. Use laminated beams (two 2×8 boardsnailed together and notched onto one side of the post with 5 or 6” wood lags) or double beams (2×8’s attached to either side of the post using 3 1/2” wood lags). Contractor opinion is split between the two methods and both deliver a strong, stable support for your joists.
Just Joists Left
After the solid beams are up, all that’s left of the framing is joists. With their ends sitting in the joist hangers and running parallel to rest on top of the beams, your joists can be 2×6 or 2×8 dimensions. Toe-nail them into the joist hangers and into the beams. Space joists no more than 16” apart and run the rim joist along the outside edges, using joist hangers again for a tight fastener fit.
Fancy Framing
If you’re doing multiple levels or inset shapes, treat every level like its own mini-deck. Build your beams and a joist system to provide the support needed for each individual level. With the deck board and railing installed, they will come together to form one flowing deck.
Rounded fronts are done by creating an arch shape with different joist lengths, notching the backside of the ring joist and bending it to fit around that arch. Measure twice or three times and cut once for the simplest installation. Use lumber that’s slightly wet for an easier bend and you’ll probably need to nail the ring joist directly into the end of the joists.

Joist toe-nailed into double beam.
Once the framing is done, fancy or not, the basic shape of your deck is laid out for you to see. Get a good visual and lay down any gravel or landscape fabric you want underneath. Now you’re ready to really see the deck take shape.
Step 3? Installing the deck boards is next on our list, so stay tuned.
Step 1 – Post Digging Party
You know you want it. A place to lounge in the sun, host an outdoor summer bash or simply sit and catch your breath is just what you need. All of that can be waiting outside the patio door if you tackled the plan to build a wood deck.
It can’t be too difficult, right? With the right tools, a few afternoons of work and at least one extra set of hands it won’t be. Your brand new, well built deck will sit proudly in your yard waiting for the kick off BBQ to start.
Building a deck is simple with only 4 basic steps:
• Posts
• Framing
• Decking
• Railing and other features
Don’t get too excited. Within those four steps are a list of tiny, baby steps and big hurdles to get over. Sounds like a challenge and DIY folks are always up for a challenge.
Throw a Post Digging Party
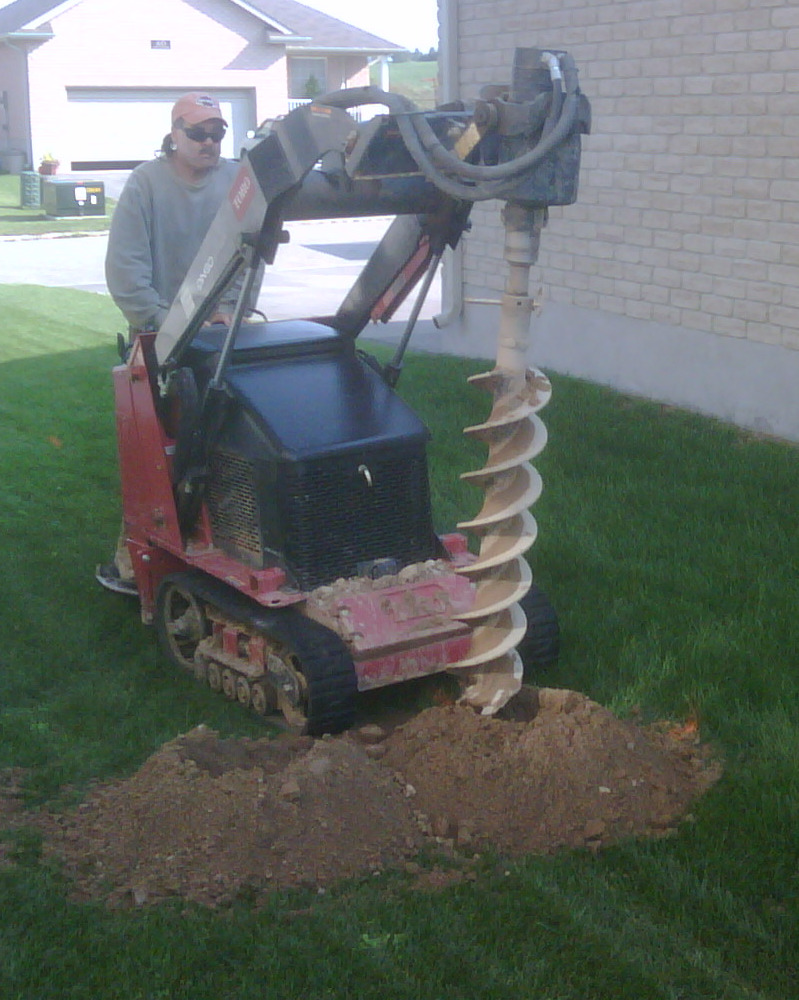
This Dingo with auger bit attached is the quick and easy way to dig post holes - well worth the rental fee.
Here’s where you can stretch those muscles and get involved in some hard labor. Mark your post holes ahead of time with paint or stakes and string. Also, give the local utilities a call to locate the phone, cable, gas and electrical lines underground. Stay safe (and keep the cable TV on).
Depending on your grade and the deck’s height off the ground, you may need to excavate or level the grade. Do what you need to do and remember that treated wood can be safely sunk in the ground.

Get the tape measure to the bottom of your 48" deep hole.
Dig your post holes about 48” deep and bell out the bottom for more stability and protection against frost heaving.
You can either extend 4×4 or 6×6 posts out of the ground and attach directly to the frame or pour a concrete pier (that’s essentially a hole filled with concrete and providing a flat surface on top). Each method requires different hardware.
For extended posts you’ll need a 3/8” x 3 1/2” wood lag to attach the framing. Use an impact driver to get the lag in with speed and accuracy. Carriage bolts (3/8” x 7”) are another possibility and work well with wood. Pre-drill your hole and set the nut tight to keep it all firm and strong.
With concrete piers you’ll need to bolt a post saddle into the concrete and attach a 4×4 with lags or carriage bolts to the saddle.
Benefits and drawbacks of either method?
Piers and saddles are good for the DIY crowd and you can get away with shorter 4×4’s or 6×6’s. Don’t skimp on the hole depth or you’ll end up with a crooked deck come spring.

Put the post against your string line and fill the hole with concrete.
Extended 4×4 or 6×6 posts are simple to install in the hole with poured concrete around them. Make sure you let the concrete set properly and use a string line to get the posts in the right locations. Don’t forget to get that level and check the posts.
Mix the concrete in a wheelbarrow or rent a cement mixer for larger jobs. This is grunt work, so draw straws. For fast simple and fast results use quick setting concrete or a specialty fence/deck post mix. You’ll need access to a nearby hose as well.
Fasteners should be 18-8 stainless steel although some contractors use hot dipped galvanized to cut costs. In coastal marine environments, opt for 316 stainless for your best protection against the elements.
Step 2? Framing is next up and coming in our next article. But have a drink and rest… those posts need to set so they’re ready to support the rest of the deck.

Aside from size specifications (length, width, etc), one of the most common questions you’ll hear when walking down the fastener aisle of your local hardware store is ‘which material should I use?’. Good question. And while most think you have to be a mechanical engineer to figure this stuff out, it’s really keeping the following 4 fundamentals top-of-mind: strength, corrosion, temperature and cost. OK, and a Masters of Engineering degree couldn’t hurt, too.
Strength
Overall strength of fasteners is measured in pounds per square inch, or psi. When talking pure steel, low carbon steel sits at the bottom at 60,000 psi. As you move up in strength you have medium carbon heat-treated steel with 120,000 psi, then low alloy steel at 150,000+ psi, up to super alloys which exceed 260,000 psi. And seriously, unless you’re building rockets, strengths above 180,000 psi are rarely required.
Let’s take a look at the strengths of some various fastener materials..
The Stainless Steel family includes 3 main categories: Austenitic, Ferritic and Martensitic. Austenitic includes grades 303, 304, 305, 316 & 321 and range from 90,000 to 125,000 psi. Ferritic includes grades 430 and 430F and hovers around 70,000 psi. Martensitic includes grades 410, 416 & 431 and climbs up to 180,000 psi. These ranges often depend on whether they can be subject to heat-treating, cold working or chemical hardening.
Other, non-ferrous metals include Aluminum alloys, Copper-based alloys, Nickel-based alloys, titanium and plastics. Pure aluminum starts at 13,000 psi, while its 2024 and 7075 grades get up to 60,000 psi. Copper-based alloys such as brass and bronze range from 50,000 psi (462 naval brass) to 105,000 psi (630 aluminum bronze). Nickel-based alloys such as Monel have 80,000 psi, with K-Monel (mixture of nickel, copper and aluminum) hitting the 130,000 psi mark. Titanium can support up to 200,000 psi. And then there are plastics, which would not be considered for their strength property, although some can support up to 10,000 psi.
In a separate, follow-up article, we’ll discuss the various properties of fasteners that all relate to its overall strength; i.e. physical, mechanical and performance properties. We’ll specifically target mechanical properties, touching upon tensile, yield, shear, torsional and fatigue strength; hardness; toughness, ductility and proof load.
Corrosion

Rusted Hex Head Screw
When it comes to fasteners, corrosion is the wearing away of metal due to interactions it has with chemicals in the environment. The most common form of corrosion is electrochemical oxidation, where the metals react with oxygen forming an iron oxide, otherwise known as rust. Other forms of corrosion include galvanic actions, high temperature oxidation and stress corrosion embrittlement.
To combat corrosion, steel fasteners will be plated or coated, which we’ll discuss in a later post. For example low alloy steels, commonly used on large structures like bridges, will be enriched with copper which foster a build-up of a special protective oxide layer over the raw steel. For marine or chemical-rich environments (e.g. paper mills), stainless steels and nonferrous alloys should be employed.
Temperature

Fasteners in a Ferrari engine need to be able to withstand high temperatures
Fasteners can be affected by extreme temperatures, both elevated and sub-zero. High temperatures, especially when 500 degrees Fahrenheit is eclipsed will negatively affect the strength of fasteners, lead to plating/coating breakdown, result in high-temp oxidation/corrosion, expansion and galling/seizing.
As a rule, nonferrous and non-metal fasteners should be avoided under high temperatures. For temps up to 450 degrees Fahrenheit, medium carbon and low alloy steels. Stainless steels and chromium-molybdenum steels (ASTM: A193 & A194) do well from 450 – 900 degrees. Super alloys like A-286 and Inco 718 last to 1200 degrees, while nickel-cobalt alloys such as M252, Rene 41, Waspalloy and Udimet can handle up to 1600 degrees. Columbium, tantalum and tungsten can perform up to 3000 degrees.
On the other end of the spectrum, severely cold environments will lead to increased yield, tensile and shear strengths, however ductility drops off as well as the fastener becoming brittle. That said, low carbon steels does not hold up in low temps. Conversely, ASTM A320 can handle down to -100 degrees Fahrenheit, while stainless steels can get down to -300 degrees. Aluminum (e.g. 2024-T4), titanium alloys, copper, brass and teflon also perform well. For extreme low temps below -450 degrees super alloys such as Inco 718, Unitemp 212, A-286, Rene 41 and Waspalloy.
Cost
Cost is probably the most clear-cut determinant of selecting your fastener material. Most plastics and low carbon steel are the cheapest options, followed by stainless steel, copper alloys, aluminum alloys, A-286, Monel, titanium, and all the way up to those that withstand blistering temperature ranges (e.g. Inco 718, Unitemp, etc)
Summary
The best thing to do is think about your project and consider these four determinants. While there will be some overlap in terms of strength and corrosion & temperature resistance, they will often inversely correlate to cost; i.e. the stronger a fastener, the more expensive it tends to get.
Let’s make this easy to digest…
- Light corrosion – steel with a coating like zinc
- Heavy corrosion – steel with a galvanized coating, stainless steel or a nonferrous alloy
- Limited magnetism – austenitic stainless steel, aluminum, copper alloy or plastics
- High electrical conductivity – aluminum or copper
- Limited electrical conductivity – plastics (non-metals)
- Light weight – aluminum (least costly) to titanium (most costly)
- Temperature resistance – stainless steel and super alloys
- High strength – super alloys and titanium
- Cost savings – low carbon steel, plastics
In a follow-up article, we’ll look at the various materials out there and discuss their strengths and weaknesses in regard to the four considerations discussed in this post. That should give you a leg-up over 90% of the rest of the fastener-buying population out there. Then you can walk into your local home improvement store and hold court. I bet even the guy working the hardware aisle will sit in.
Want to make life easier? OK, how about just making your work-life easier? That’s well within your reach with these 11 must-have apps for contractors. Turn your iPhone into your most important business tool with these handy-to-have mobile applications.
Get ‘Er Done – Basic Productivity Apps

CalenGoo
asdf
• CalenGoo – Perfect for syncing your Google calendar on your iPhone, iPad or iPod Touch on the fly. Book appointments, check your schedule and merge with other Google users to amalgamate schedules. This app will let you know where you should be and when. – $6.99 on iTunes for newest version 1.5.3

Bento
asdf
asdf
asdf
• Bento – Want to have everything you need to organize life in one app? This does is it. For less than the price of lunch, you can use one of the 25 preloaded templates or sort through the app and create your own customized tools to get the ultimate in organization. – $4.99 on iTunes for the newest version 1.0.5

Dropbox
asdf
asdf
asdf
• Dropbox – This app is an excellent way to share files across multiple computers and mobiles. Hooked up to your Dropbox account, you can access, view and share files of all sorts from anywhere. OK, not just an excellent way, Dropbox should be the only way. Did I mention that it’s completely free? – Free on iTunes for newest version
asdf
asdf

Business Card Reader
asdf
asdf
asdf
• Business Card Reader – Think of all that time you’ve spent inputting contact info into your iPhone. No more. With this handy app you can take a photo of someone’s card and have all of the info right at your fingertips, no fiddling with data processing in any way. – $5.99 on iTunes for newest version 1.3

OnTask
asdf
asdf
asdf
• OnTask – This one will keep you productive in every sense of the word. Hooked up to your OnTask account (which is a subscribed service), you can easily keep track of schedules and present that information to your team and client easily. $4.99 on iTunes for newest version 2.0 that comes with 6 month subscription
asdf
Geek Squad – Techy Tools for Your Job

Bump
asdf
• Bump – It’s marketed as a social networking tool, but this app can do wonders for inter-company communications. Just “bump” your iPhone (literally) with other users of the app and you can share photos, calendar info and even chat/text phone to phone for free. Great for streamlining and keeping in touch. – Free on iTunes for newest version 2.0.1

Quad Level
asdf
asdf
asdf
• Quad Level – You might never need that bulky level again with this handy app. Displaying horizontal, vertical, 2D and diagonal readings, this baby also reads in metric and imperial for those necessary times of conversion. – $0.99 on iTunes for newest version 1.1

HVAC Duct Sizer
asdf
asdf
asdf
asdf
• HVAC Duct Sizer – If you’re working in the HVAC field, get this app. Pronto. You’ll be surprised at how many times you use it for quick calculations or to double check your figures. Perfect for employees in training, too. – $6.99 on iTunes for newest version 1.6
asdf
asdf

Carpenter's Helper Pro
asdf
asdf
asdf
• Carpenter’s Helper Pro – The big daddy of this article, the Pro version gives contractors almost everything they need to make calculations, create accurate estimates and plan out your projects. The Quick Job feature has a selection of the usual contractor suspects including drywall, fencing and roofing. There’s a Lite version at no cost, but for the serious contractor the Pro level is a must. – $9.99 on iTunes for newest version 2.0
asdf
Piggy Bank – To Help the Cash Flow

Expensify
asdf
• Expensify – Organize your receipts the easy way and create expense reports that “don’t suck,” as the app review so clearly states. Make your bookkeeper happy for a change with this one. The price is another kicker that’s good for the cash flow. – Free on iTunes for newest version 2.4

Co-Pilot Live
asdf
asdf
• Co-Pilot Live – So it’s not strictly a financial tool for your company, but this app is bound to save you money. Skip the GPS with its subscriptions and huge sticker price. Opt instead for this app that will get you where you need to go, fast. – $19.99 on iTunes for newest version 8.0.0.815
asdf
asdf
Whether you’re looking to network, schedule, keep the books or do an accurate estimate, don’t worry – there’s an app for that. Get moving and do business better with these must have titles for your iPhone. Look for the list of top Blackberry and Droid apps coming soon, a range of mobile tools to keep your business at the top of its game.
This is second post in the series of the “Nuts and Bolts” education series about fasteners. This article is part 1 in a series of 3 covering Nails.
First, a little nail terminology. There are three main parts of the nail: the head, the shank and the point.
![]()
![]() The nail head is the wide, flat section at top which is struck (generally with a hammer) to drive the nail into the material.
The nail head is the wide, flat section at top which is struck (generally with a hammer) to drive the nail into the material.
asdfasd
![]() The nail shank is the middle of the nail which provides the holding power.
The nail shank is the middle of the nail which provides the holding power.
asdf
The nail point is the sharp tip of the nail which penetrates the material.![]()
asdf
asdf
There are several types of heads, shanks and points which we’ll cover in part 4 of this nail series.
Additionally, nails have various sizing. Generally, nails are measured by size, gauge and head size. The size is the length of the nail, measured from under the nail head to the tip of the point. Size is measured in inches in the United States, or millimeters elsewhere. Alternatively, size can be measured in pennies (“D” symbol); e.g. in Common Nails, size 1 1/4″ is also 3D, whereas 6″ is 60D. Gauge is the diameter of the nail shank. And head size is the diameter of the head.
Nails can be grouped in four basic categories: General Construction, Outdoor Construction and Roofing & Siding . This article focuses specifically on the General Construction group.
Within the General Construction category are four sub-categories: General Construction, Finish & Trim Work, Flooring & Masonry and Miscellaneous.
General Construction
 Common Nails are the most popular and versatile of the nail family. They’re used in construction, carpenty and framing applications. They have a larger shank which provides greater resistance to bending.
asdf
 Box Nails are used for construction, carpentry, framing and box making. They have a smooth, slender shank which helps to reduce wood splitting.
asdfas
Duplex Nails are used in temporary construction where the nails will be removed, thus the second head remains exposed. Such typical jobs would be concrete forming and scaffolding.
asdf
 Framing Nails are used on construction jobs where their slender shank (thinner than a common nail but thicker than a box nail) aids in being driven into the material quickly and easily.
asdf
 Sinker Nails are used in construction, carpentry and framing. They have a checkered, countersunk head allowing them to sink flush with the material surface. They also have a vinyl-coated smooth shank for simpler installation and additional holding power.
asdf
 Cooler Nails are used for general construction and framing. They are closest to sinker nails, except their head is flat instead of countersunk.
asdfsd
 Polebarn Nails are hardened yielding greater strength for load-bearing wooden structures where holding power is essential.
asdfsad
 Fence Staples are just what they sound like — they’re used for attaching woven wire fence, welded fence or barbed wire to wooden fence posts.
asdfasd
 Joist Hanger Nails are for attaching joist hangers (seen to the right) to wood studs. They have a short, heavy gauge which provide increased holding power without entirely penetrating the wood.
asdfdfasdfasdfdsf
 Truss Nails are designed to attach truss plates (seen to the right)
 between multiple pieces of wood. Several Truss Nails are typically used in truss plates so they are made thinner than joist hanger nails to avoid wood splitting.
Finish & Trim Work
 Finishing Nails are used for trim and fine, detailed finishing work. They have a small diameter and cupped head so they can be countersunk beneath the material surface, for a finished appearance.
asdfCa
![]() Casing Nails are similar to Finishing Nails but have a heavier gauge for door jams and window mouldings.
Casing Nails are similar to Finishing Nails but have a heavier gauge for door jams and window mouldings.
asdf
 Trim Nails are also referred to as Hardwood Trim Nails are used for fastening hardwood mouldings and have a brad-style head, which is easy to conceal.
asdf
Flooring & Masonry

Securing furring strips to cement cinder blocks
Securing furring strips to cement cinder blocks
 Underlayment Nails are used when laying plywood or subfloors over existing wood floors or floor joists. Their shank is ribbed for greater holding power, similar to threads on a screw.
asdf
![]() Cut Floor Nails secure hardwood strip flooring to the subfloor as well as wood framing or furring strips to brick, block or concrete. They are often used in restoration jobs, as they are the “antique” version of today’s Flooring Nails (see below). The wider nail side is driven parallel to the wood grain.
Cut Floor Nails secure hardwood strip flooring to the subfloor as well as wood framing or furring strips to brick, block or concrete. They are often used in restoration jobs, as they are the “antique” version of today’s Flooring Nails (see below). The wider nail side is driven parallel to the wood grain.
asdf
 Flooring Nails are just what they sound like.. nails used to secure hardwood strip flooring to the subfloor.
asdf
![]() Cut Masonry Nail are used to attach wood to cinder block, mortar joints, brick walls or fresh concrete. Their blunt point and tapered shank help reduce splitting.
Cut Masonry Nail are used to attach wood to cinder block, mortar joints, brick walls or fresh concrete. Their blunt point and tapered shank help reduce splitting.
asdf
 Masonry Nails are used for attaching furring strips and floor plates to uncured concrete.
asdf
asdf
 Masonry “Stub” Nails are similar to regular Masonry Nails except they have a larger diameter head. This variation is typically used in applications where a smooth masonry style nail is required; e.g. fastening pipe conduit, switch boxes, corner beads or wire mesh to masonry walls.
asdf
![]() Metal Round Cap Masonry Nails have a beveled washer around the head to help secure insulation to exterior surfaces. They are fluted to penetrate masonry without cracks.
Metal Round Cap Masonry Nails have a beveled washer around the head to help secure insulation to exterior surfaces. They are fluted to penetrate masonry without cracks.
asdf
 Tension Pins are used to attach furring strips, clips, hangers, etc to concrete blocks or mortared joints.
asadf
Miscellaneous
![]() Spikes are used when securing railroad ties, landscaping timbers and thick members used in log home construction, as they typically start in smallest lengths of 7 inches.
Spikes are used when securing railroad ties, landscaping timbers and thick members used in log home construction, as they typically start in smallest lengths of 7 inches.
asdf
![]() Gutter Spikes, no surprise, are used to attach gutters. They have thinner shanks and larger heads than spikes.
Gutter Spikes, no surprise, are used to attach gutters. They have thinner shanks and larger heads than spikes.
asdf
asdfasdf\
![]() Panel Board Nails attach panel boards to wood furring strips or studs.
Panel Board Nails attach panel boards to wood furring strips or studs.
asdf
 Furring Nails are used mainly on stucco projects where wire mesh needs to be secured to the exterior wall for application of stucco mud.
asdfads
![]() Wrought Head Cut Nails are used on restoration jobs where an antique look is the goal, with their 3-sided head and black oxide coating.
Wrought Head Cut Nails are used on restoration jobs where an antique look is the goal, with their 3-sided head and black oxide coating.
asdf
![]() Foundry Nails are used for foundry casting work, concrete form work and metal sculpturing.
Foundry Nails are used for foundry casting work, concrete form work and metal sculpturing.
asdf
 Hinge Nails have a rounded head and are used in antique hinges and face-nailing doors.
asdf
asdfadsf
![]() Nursery Nails or Pin Nails help fasten burlap around tree and shrub root balls, to help protect the plant and retain water.
Nursery Nails or Pin Nails help fasten burlap around tree and shrub root balls, to help protect the plant and retain water.
adsf
![]() Pallet Nails are spiral riveted which provides exceptional holding power for wooden pallet
Pallet Nails are spiral riveted which provides exceptional holding power for wooden pallet  construction and durability. They have round, well-centered heads which feed cleanly through automated nailing machines.
asdf
asdf
Check back in for part 2 of this series where we’ll delve into the Outdoor Construction category of nails.
A question commonly asked by those purchasing or consuming fasteners is in regard to the very element that allows a bolt to fasten to a nut or a screw to fasten to a piece of wood or metal — the threads. In this post, we’ll discuss fastener threading, uncover the pros and cons to coarse and fine-threaded fasteners, and wrap up with the three classes of thread fit. There are also a couple diagrams and tables (at bottom) to cement your understanding of the elements which determine threading.
Threading 101
Inch sizes primarily come in either Unified Coarse (UNC) or Unified Fine (UNF) which define the number of threads per inch which are typically standardized based on the gauge. There are also UNR and UNJ threads, which vary only slightly in root radius from the conventional threading. Conversely, the thread pitch – distance between threads – is referred to as threads-per-inch (TPI) or sometimes simply as the pitch (see Bolt size vs. TPI (UNC, UNF) table at bottom of post).

In other words, UNC fasteners have less threads per inch (pitch) than UNF. UNC thread is defined by the thread having a 60° angle, the flat being 1/8th the size of the pitch and the depth being 0.64951 in relations to the pitch. See diagram below.

In the instance of a 1/2″ sized bolt, 1/2-13 would represent a UNC bolt with 13 threads per inch, while 1/2-20 would represent a UNF bolt with 20 threads per inch.
The alternative to inch sizing is metric. Metric screws are much simpler to specify being Maa x bb where aa is the diameter in millimeters (mm) and bb is the ‘pitch’ – the distance in millimeters (mm) between threads. So M3.5 x 0.6 has a 3.5mm diameter and a pitch of 0.6 mm. To convert from inches to millimeters divide 25.4 by the Thread-per-Inch (TPI value, thus a fastener with a TPI of 32 will give 0.793mm (0.8) and one with a TPI of 56 will give 0.45mm.
More information on metric sizing and their equivalence to inch-based fasteners is discussed here.
Why choose fine threading?

Fine-Threaded Bolt
Fine-Threaded Bolt
Proponents of fine-threaded fasteners cite the following:
- Fine-threaded fasteners, with their larger tensile stress area, exhibit higher tensile strength
- Likewise, higher degrees of torsional and transverse shear strengths exist because of their larger minor diameters
- Fine-threaded fasteners are suited better for hard, thin-walled materials as they penetrate more easily than their coarse-threaded counterparts
- Fine-threaded fasteners can be torqued to a higher degree of accuracy because of their smaller helix angle
- Less torque is required to develop equivalent bolt pre-loads
- Fine-threaded fasteners are less prone to come loose under vibrations
While these most of these facts are pervasive in the fastener world, let’s take a second to debunk a couple myths… Fine-threaded fasteners can be adjusted more accurately, however both coarse and fine-threaded fasteners require equal amounts of torque for pre-loading and are both subject to the same effects of vibration and many other factors prevalent in fasteners becoming loosened.
Why go with coarse threading?

Coarse-Threaded Bolt
Proponents of coarse-threaded cite the following:
- Coarse-threaded fasteners exhibit higher stripping strengths; i.e. the amount of force required to strip a fastener’s threads
- Coarse-threaded fasteners should exhibit better fatigue resistance since stress concentration factors at thread roots decrease with increasing thread pitch
- Coarse-threaded fasteners can handle more wear and tear during shipping and handling
- With coarse threads having less of a tendency to cross-thread, they assemble and disassemble more easily
- They resist strength loss and corrosion as they tend to combat thread overlap during nut dilation
- Coatings and platings are better laid in the larger threading of coarse fasteners, particularly Class 2A/2B fits (read more on Thread Fit Classing below)
- Coarse-threaded fasteners are suited better for brittle materials than their fine-threaded counterparts
Trending
During the past two decades, the trend seems to favor coarse threads over fine. This shift is most likely due to coarse fasteners being the simplified version of their technically advanced, but unnecessary fine-threaded cousins. In North America, while coarse threads prevail for all sizes (diameters), fine threads seem to only remain in the extreme sizes of less than #0 and greater than 1″.
Thread Fit Classes
There are three generally accepted deviations or classes of thread fitting: 1A/1B, 2A/2B and 3A/3B. As you progress from 1 to 2 to 3, the “interference” ratio between the external and internal threads, increase; i.e. 3A/3B will have a tighter fit than a 2A/2B, which will have a tighter fit than a 1A/1B. The “A” denotes the external thread and the “B” the internal thread.
1A/1B is a very loose fit and is generally only used for rare mechanical fasteners where quick assembly is of prime importance. Such fitting comprises only .1% of all fasteners manufactured today. Conversely, 2A/2B accounts for roughly 90% of the fasteners manufactured today and have an average degree of interference. Finally, 3A/3B maintain very tight fits and are used in applications where safety is the biggest factor; e.g. within socket cap/set screws, aerospace bolts/nuts, etc.
Summary
There are many things to consider when buying and using fasteners, including size, drive, length and others. But perhaps the most technical (advanced, engineering-wise) and least understood component are the threads. Hopefully this post helped clear up the mystery of threading, helping you make more educated fastener-buying decisions going forward.

Bolt Size vs. TPI (UNC, UNF)
Have any corrections to this posting or feel it can use additional information? Please add to the comments below and we’ll be sure to work them in!

Contractor Fail
There comes a time when a project gets too long, too technical, and/or too involved for the average do-it-yourselfer to tackle by himself. It’s at that point, that they will turn to a professional for help. Rest assured, this is not an easy decision. These potential customers of yours are bombarded by local ads, references from friends and family, websites, or simply, contractor trucks they see drive by or parked in neighbors’ driveways. The educated consumer will plot carefully and avoid leaping at the first contractor to bid on their project. Realistically, they will have several would-be candidates state their case of why they’re best fit to get the job done.
Below is a list of the top 10 qualifiers that will separate you, Joe Contractor, from the pack. Follow these suggestions and you should sail through the customer-contractor interview stage; complete the project successfully and ensure an endless wave of happy customers, positive referrals and job security for the foreseeable future.
#1 Punctuality
How better to start this list and the dance of convincing the customer you’re their man (or woman) than on the subject of being punctual? If there is one generalization made about contractors is that they’re never on time. Prove this stereotype wrong by making appointments and sticking to them.
Believe it or not, some contractors feel they’re so booked up with other, more important customers, that this customer can and will understand. They juggle 10 customers, upsetting them all, rather than establishing trust and ensuring a happy outcome with 2 or 3. What this group of contractors is not considering is that the customer most likely had to rearrange work schedules, have someone else pick up the kids and ask the neighbor to feed the dog in order to make an appointment to meet them. The customer is most likely not sitting at home waiting for you to show up, gushing at the chance to hand you their money on your terms.
Start things off right — call the potential customer, set up a day and time that not only works best for them, but one you’ll 100% be able to commit to. Start off on the right foot by practicing these steps when setting up your initial appointment to meet the customer and quote the work estimate.
But that’s just day one. Until the project is completely finished, you should be sure that you (and your crew) are on site every day, following the same schedule. The customer may have questions for you one morning and instead of being reliable and showing up at 8:00 AM as promised, you stroll in at 10:30 and miss an opportunity to connect with and check in on your customer.
Stick to a routine, and if for some reason you can’t make it in on time or need to leave early, give the customer the courtesy of a phone call to let them know. This acknowledges your understanding of their, too, busy schedules and will do wonders in avoiding frustrations.
#2 Put Your Work on Display … Use the Internet
These days, people have lots of options to choose from when it comes to just about anything … which grocery store to use, which line of fabric softener, green and natural vs. traditional, and which contractor to use. One major deciding factor for a growing number of people is being to look them up online and find out more than what they see on a commercial or business card.
Using the internet to promote your business is a must today. It doesn’t need to be the most technologically advanced website out there, but you should be sure to include at least the following:
- Services: Let prospects know all of the services you offer. While they may be looking for someone to paint a room, they may come to find that you also repair gutters, sparing them a trip to their roof and landing you extra work.
- Gallery: You know the saying … “a picture is worth a thousand words”. In this case, replace “words” with “dollars”. The more your customer can see for themselves your level of craftsmanship, the more easily sold they’ll be. Try to make sure you have several pictures of each of your services (discussed above) to ensure the customer has a good chance to associate your portfolio to their upcoming project. You might also include video. YouTube is a popular way to embed videos on your site; you can read more on how to do that here or watch a video on it here.
- References/Testimonials: Use your past and current customer base to help convince prospective clients that your work is top notch. Ask them to write quotes which you intend to publish on your site. You can even go a step further and create video testimonials; you can read more on how to do that using Skype here.
- Contact: Make sure you provide as many forms of contact as possible, including: cell phone, work phone, email, fax, pager, Skype. You might also include other online places people can contact and follow you including: Twitter, Facebook, LinkedIn, MySpace, etc. You may also wish to create a contact form on your website where people can submit questions or leave feedback from recent jobs which you can then incorporate into your references/testimonials section.
There are a ton of resources out there for building your web presence and marketing your business online. You can start off by reading John Jantsch’s Duct Tape Marketing. I would also suggest reading Twitter 101 for Business. Yahoo! Small Business still has some helpful information and can get you up and running with your site fairly easily. What this presentation to find out “What the F*ck is Social Media“? Or you might also wish to head over to Technorati and read up/track some of the Small Business blogs.
Again, the supply of information on this subject alone is enough to write a series of books (and they do exist!). It can be overwhelming. Shoot me an email if you need some help with building a website, writing a blog, social/online marketing, SEO practices or basic advertising. It’s not my profession and I have no intention of charging you. I just know what it’s like to be starting from scratch and would be happy to lend a hand.
#3 Appearance
Short and sweet, first appearances are everything. You need to look and act like a professional from the moment you first pull up to the job site. At a minimum, this includes dressing appropriately. Don’t show up covered in dirt, with ripped jean shorts and a Hooters t-shirt. A pair of khakis and a company-branded polo will set a much better first impression. This goes for your workers, too. While most jobs can get messy, make sure your employees are somewhat presentable and keep the truck driver dialogue to a minimum. Also, under no circumstances should you or your staff smoke while on the job. This is a huge red flag to the rest of the world that opts to keep cancer-causing fumes out of their homes and offices.
If possible, take a company vehicle to the job. Seeing a contractor pull up in some old, beat up hoopty is surely a way to set off alarm bells. Customers are hiring professionals, not a deadbeat who lives and works out of their ‘84 Honda pick-up truck.
#4 Competitive & Detailed Pricing
So now that you’ve wooed and impressed your potential sale and showed up on time, it’s time to put an estimate for your services together. Aside from the first impressions, this stage is the most critical. This is the phase where the customer associates their dreams of a new deck or second story addition with the dollars it will cost to get done. There are two key points to nailing the pricing of your work: (1) the competitiveness of your pricing, and (2) the level of detail provided in the quote. Let’s attack them one at a time.
Are you competitive?
Above everything else you’ll read in this article, if your prices are double or triple that of your competition, you will rest-assured not only insult your customer, but find yourself losing out on bids time after time.
Every contractor has their price target where they factor in how much they’d like to profit from the job, minus how much time, effort and money it will cost them to perform a job for the customer. It’s a fairly simply cost-plus model, however some contractors wallets are bigger than their heads and they price jobs out of range.
First, be honest about what your upfront costs will be (see more under “Details, Details, Details” below). From there, factor in the total time you’ll invest and what your rate is. Once you have those two metrics, you’ll have a picture of what you can realistically expect to charge.
It’s also important not to cut yourself short and under-bid. This may also serve as a red flag to the customer, indicating you might use cheap products or unskilled laborers. On your end, if you simply didn’t do your homework and charged too little, you’ll most likely wind up rushing through the project, skimping out on quality and subsequently damaging the perception your customer will have of you.
When you’re first starting off, you might even shop your estimate around to friends, family, other contractors, or professional forums/sites such as contractortalk.com or servicemagic.com to see if you’re in the right ballpark.
Just keep in mind that the average customer will have at least one or two other competing bids they’re looking at. If you want to get past this point, you need to remain competitive. Be ready to bargain. A savvy customer will pit you against other (real or imaginary) contractor’s price tags. Have a range in mind when you submit your bid, and be prepared to negotiate to a cost that’s acceptable to both you and the customer.
Details, Details, Details
Nothing complicates this process more than a customer getting handed a quote with one line on it that says “Project XYZ: $20,000.00″. If you want to avoid a tennis match between you and the customer of confusion and renegotiations, provide as much information as possible in your quote. At a high level, your quote should have two sections: one for materials and one for service. Within each section, give the lowest level of detail possible. For instance, if you’re installing a new tub for someone, you may want to have the following breakdown:
Materials
- <Brand and model> Tub: $500
- Wood frame base: $50
- Wood screws: $5
- 18-8 Stainless Steel Hex Head Cap Screws: $5
- Cement foundation: $20
- Silicone sealant: $5
- Total: $575
Services
- Removal of old tub: $100
- Disposal of old tub at off-site trash dump: $150
- Lay cement foundation: $50
- Build wood frame and fasten to wall: $100
- Install and seal tub: $100
- Total: $500
Sub-total: $1075.00
Tax: $64.50
Grand Total: $1139.50
Here is a good template I’ve found which spells out the details of the job clearly. This format ensures each and every line item is broken down for the customer to review.
You’ve now left your customer with a highly competitive, detailed price breakdown. No confusion, no need to rework the estimate and potentially lose out to someone that had put in the extra effort off the bat. The customer only need make a Yes/No decision.
#5 Communication
So you impressed the customer enough to win the contract. The rest is on your shoulders to deliver as promised. Communication is a highly underrated tool to keep your customer happy. Most make the mistake (see the Punctuality section above) of missing out on opportunities to connect with their customer and make sure things are going as planned. Catching a concern of theirs early will eliminate grand dilemmas down the road. Whether good or bad, be prepared to openly discuss all elements of the job with your customer. And be ready to talk, whenever the need arises. If it’s first thing in the morning, or late at night, try to remain as reachable as possible. A customer who can’t get in touch with their contractor to discuss a design flaw or a leaking roof will grow agitated quickly, endangering the relationship and the future of the job.
And like any good project manager (that’s part of your job, too), share status (again, good or bad) as it’s happening. This doesn’t mean to call your customer each time a piece of dry-wall goes up, but don’t make them hunt you down. You and your team are unsupervised all day in their personal space. Employ some common sense and pick up the phone at the beginning of each work day to let them know what you have planned. When you’re wrapping up for the day (as long as you’re not becoming a nuisance) give another quick call to let them know how things went and when they’ll next see you. Don’t let them find surprises on their own — if your guys knocked over a Tiffany vase, tell your customer and make sure they know it will be deducted from their invoice.
There will also be times throughout the project that the customer will need help deciding on something. A picket or privacy fence along the driveway? Natural stone or porcelain tiles in the kitchen? Remember, you were hired because you’re the expert. Talk to your customer. Helping to make their decisions easier by offering experience-based suggestions will surely create a lasting bond.
Finally, like we covered in the References/Testimonials section (under Contact), give out as many means of reaching you as possible. Some may prefer to pick up a phone, some may want to meet in person, while others will opt to email. You’re not a doctor and you have your own life. Be upfront and let your customer know the best times to reach you. Be flexible and be available.
#6 Quality Products
Part of the trust a customer bestows in you is your selection of the best (at least better than average) products. Yes, they’re paying you for your service, but also for the materials you use on the job as well as peace of mind that your finished work will hold up over time.
Any GC can head to Home Depot to fill a job’s material list. And nothing against them, but as we all know, Home Depot’s products are often second-rate. Go take a walk down their wood aisle and tally up how many panels of plywood have knots strewn through them or are completely warped and bowing. And what about their fastener supplies? Not much in the way of 18-8, 316 or 410 stainless steel to resist oxidation and corrosion. And it’s rare you’ll ever find bolts with premium-grade strengths; e.g. grade 5, grade 8, etc. What about nails for a siding contract? Are they double hot-dipped galvanized or your run-of-the-mill nails which will surely rust and bleed all over your customer’s siding after the first rain?
Do yourself and your customers a favor .. order your supplies from a reputable supplier, and do your research when it comes to which fasteners are right for the job.
#7 Hiring 101
Let’s pretend for a minute. You know that new HD flat screen that you bought at Best Buy last month? Well, you can’t get your universal remote programmed with it? So what do you do? You call their customer service number. And on this particular support call, you happen to get “Mary” who has zero customer service etiquette, giving you an attitude from the moment the call starts. After 30 seconds, she’s berating you to the point where you hang up in disgust. As important as Best Buy claims quality of customer service is, and as much as they pride themselves on being one of the top retail chains in the US, your negative experience with 1 of their tens of thousands of employees has scorned you. What are the chances you’ll buy your next big appliance from Best Buy? Slim, right?
Now apply that story to your company and the staff you employ. While you, personally, may be a true craftsman, your work is portrayed by the efforts of your entire staff. From your office admin answering calls, to the skilled laborers you have on the job. It may be tempting to hire cheap labor and stuff a few more dollars in your own pocket, but quality and professionalism go a long way. If your company is lean, with only a dozen or so employees, get involved in screening each hire to make sure they come recommended and live up to their hype. Monitor their work for the first few weeks and make sure they know the do’s and don’ts.
As always, your employees will follow your lead. If you show the utmost pride in your work and for your customers, then your staff will to. You want to breed a culture within your workforce that treats your company and your customers with respect, and has pride and ownership in the work they do.
#8 Clean Up – Every Day
I can’t stress this enough, no one likes coming home to a house full of saw dust, tracked in dirt, lunch wrappers and tools strewn all over the place. Sure, some jobs are big and messy, but that doesn’t mean your customer needs to be exposed to all of it after your work for the day is done. Go above what is expected of you, and leave the house as tidy as possible, even if it means breaking 30 minutes early to clean up, it will go a long way.
#9 Follow-up
You finished the job, keeping your customer happy the entire way through .. congratulations! But your work isn’t over. One of the core principles in the world of Sales (guess what, another part of your job is also Sales) is that your warmest leads are not new customers with new projects, but re-engaging and/or up-selling your existing customer base. If you truly impressed your customer, you’ll most likely be their contractor of choice for a lifetime. And not only for their projects, but for their entire network.
Do the right thing and check in with them from time to time. Make sure they’re satisfied with your work, leaving the door open for future work request. And if problems pop up, make sure to let them know that your work is guaranteed and you’ll be happy to respond to any concerns.
Summary
You’ve made it! You learned what it takes to be timely. You’ve provided a portfolio to view your past jobs. You looked (and acted) professional. Your pricing was fair, with no hidden terms. You kept your customer in the know, throughout the job. You used only the best materials. Your staff is professional and takes pride in their work. You’ve cleaned up after yourself, every day. And when the job was complete, you checked in to keep your customer close and happy.
In the end, it comes down to two things: keep your customers happy and perform the work at the level you’d expect someone else to provide to you.

Grade 2-Plated 1/4-20 x 1" Hex Bolts
This article is part of a series covering “The Nuts and Bolts” of common fasteners used in everyday projects. We’ll cover what the fastener is, typical applications, available materials and strengths, head types, sizes, and other helpful information.
Typical Use
Hex bolts, are used on construction projects where materials need to be secured together; such as mounting a bicycle seat, putting together a swing set or building a boat dock. They’re fastened in place with hex nuts. A wrench is often used to tighten the nut to the bolt with an appropriate amount of torque. Flat washers may also be used to help seat the bolt and cover any excess space/gap between the hole the bolt is going through and the bolt head. Lock washers, while also helping to seat the bolt and cover gaps, also help keep the assembly from shifting.